
A garage door keypad is a simple and convenient way to enter your garage. You don’t need a remote control, just a code that you can type on the keypad. The keypad also has a security lock to protect the door from unauthorized access. The keypad is usually located outside the garage door.
Resetting Chamberlain Garage Door Opener
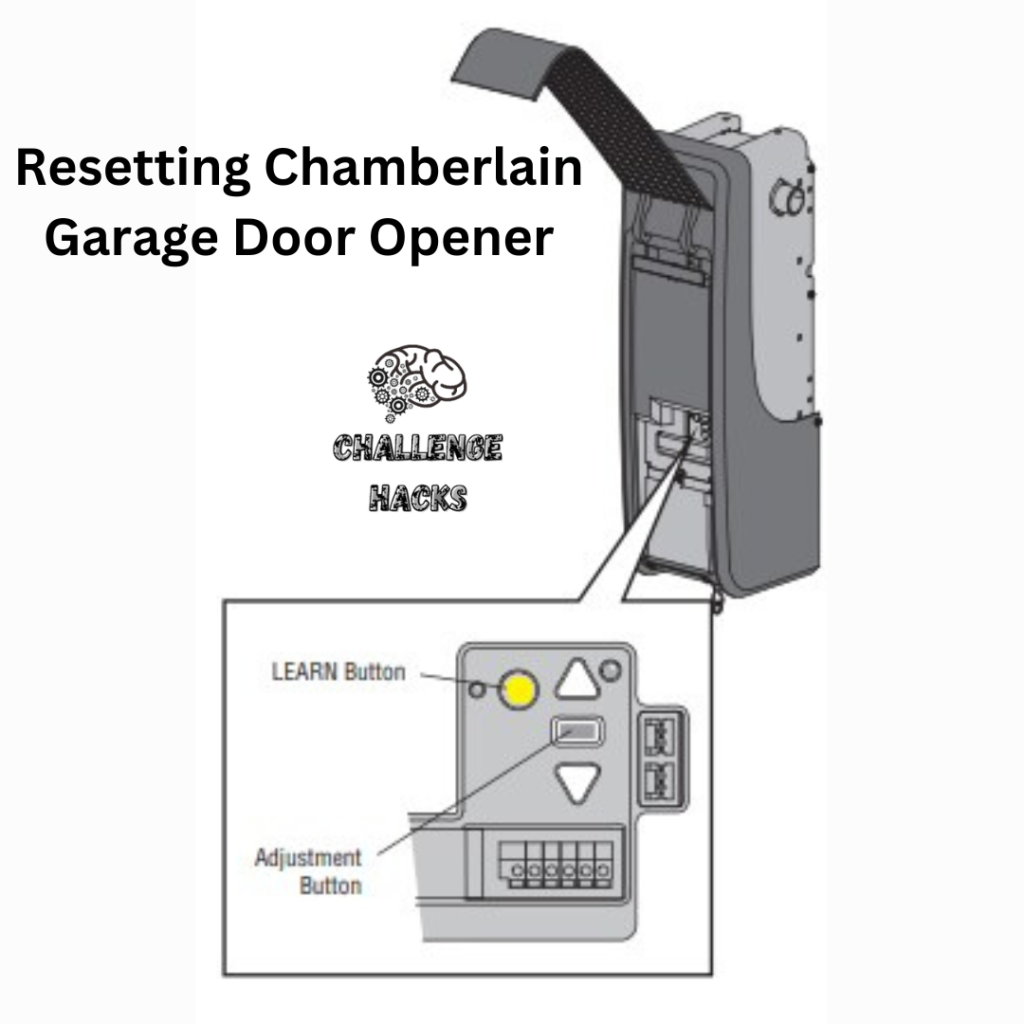
If you have a Chamberlain garage door opener, you may need to reset it if it stops working properly, or if you lose or misplace your remote control. Resetting Chamberlain Garage Door Opener will erase all the previous codes and remote controls from its memory. To Resetting Chamberlain Garage Door Opener, you need to press the LEARN button on the opener for 6 seconds until the LED light goes off. Then you need to program a new remote control or code to the opener.
Step-by-Step Instructions for Resetting a Chamberlain Garage Door Opener
If your remote control is missing or stolen, or if your Chamberlain garage door opener is not working properly, you need to Resetting Chamberlain Garage Door Opener.
How to Resetting Chamberlain Garage Door Opener To Resetting Chamberlain Garage Door Opener, you have to press and hold the LEARN button on the motor housing for 6 seconds, until the LED light turns off. This will delete all the codes and remote controls from the opener’s memory. To check, try using your remote. It should not work.
Here is a table summarizing the steps to reset and configure a Chamberlain garage door opener:
| Step | Action | Details |
|---|---|---|
| 1. Erase Memory | Erase the memory of your Chamberlain opener. | Refer to the user manual for instructions. |
| 2. Reconnect Remote Control | Reattach your remote control after resetting. | Follow specific instructions based on your opener type and LEARN button color. |
| 3. Configure Keypad | Deactivate the opener by configuring the keypad. | An efficient method for securing access. |
This table provides a clear overview of the steps involved in Resetting Chamberlain Garage Door Opener and configuring a Chamberlain garage door opener, helping users understand the process at a glance.
Step 1: Delete the Chamberlain Garage Door Opener’s Memory
To erase the old programming codes and Resetting Chamberlain Garage Door Opener, you need to find the LEARN button first. This button is on the back of the motor housing.
Resetting Chamberlain Garage Door Opener by pressing the LEARN button Some of the newer models also have an LED light next to the LEARN button.
Next, you have to press and hold the LEARN button for about 6 seconds, until the LED light turns off.
When the LED is off, it means that all the remote control and keyless entry codes have been deleted.
To check if you have reset your opener correctly, try using the remote control that was linked to your garage door opener. The door should not react.
However, you should be careful around the door as it might open and shut when the new controls are being set up.
Step 2: Reconnect your remote control and program it
After Resetting Chamberlain Garage Door Opener, you need to link your remote control again.
How to Reset Remote Control for Chamberlain Garage Door?
To program your Chamberlain remote control, follow these steps:
- Remove the metal clip from your remote control. This will show a small button on the back center of your remote (on newer models, this button may be on the front or side of the remote).
- Press the button with the metal clip.
- You should see an LED light on the front of your remote control.
For Newer Models (skip to the next section for older models):
- Press and release the LEARN button on your garage door opener.
- Within 30 seconds, press and release the desired remote control button.
- See if the garage door opener light bulb flashes. If not, wait for the remote control LED to become solid, and then slowly press and release the remote control button again.
- Do this until the light bulb flashes. DO NOT press the button after the lightbulb flashes!
For Older Models:
- Determine the color of your Chamberlain motor housing’s LEARN button. Press and RELEASE the remote button you want to program using the number of presses indicated by the table above.
- After pressing the remote button the right number of times, press a different button on the remote once. The LED light on the remote should turn off.
- Then, on your Chamberlain motor housing, press and release the LEARN button.
- Lastly, press the remote button you just programmed once and the light on the opener should blink, press it again and your garage door should open/close!
Step 3: Factory Reset the Chamberlain Keypad
To set up your Chamberlain Keypad, follow these simple steps to Resetting Chamberlain Garage Door Opener.
- Press the LEARN button on the Chamberlain garage door motor housing. The LED light should turn on, indicating you have 30 seconds to configure the keypad.
- On the keypad, enter your four-digit code and press enter to confirm the code.
- Hold down the ENTER button until a click is heard and the LED light flashes on the overhead Chamberlain garage door motor housing.
- Once the door shuts, enter your four-digit code and press enter again.
- The door should open, and you will be able to enter your code and use the keypad as normal.
If you experience any issues with the keypad after a few days, you may need to Resetting Chamberlain Garage Door Opener by following these steps:
- Press and hold both the * and # buttons on the keypad until the lights on the keypad light up and then stop blinking.
- On the keypad, enter a new four-digit code.
- Press the # button.
- Press the ENTER button the number of times that matches the color of your LEARN button. For example, if your LEARN button is yellow, press ENTER once.
- Finally, press 0 on the keypad to exit programming mode.
Now go to the Chamberlain garage door motor housing and press the LEARN button once. The LED on the motor housing will remain lit, indicating that your keypad is in learning mode.
- Go back to the keypad and enter your four-digit code again, then press and hold the ENTER button on the keypad until the light blinks in the motor housing.
Your keypad should now be synchronized and ready to use. Feel free to test it out to make sure everything is working as it should be.
Manuals and assistance:
If you have trouble with any of the steps above, you can check the manual for your specific Resetting Chamberlain Garage Door Opener.
You can go to the Chamberlain Group website, where you can find many old manuals that you can download.
If you don’t know what model opener you have, just look at the motor housing on your Chamberlain garage door opener and you’ll see a sticker on the side with your exact model number.
If you’re still having problems, you can call Chamberlain directly at 1 (800)-528-5880. They should be able to help you. Their hours are:
Monday – Friday: 8:00 am – 9:00 pm EDT Saturday: 10:00 am – 7:00 pm EDT Sunday: CLOSED
Conclusion If your Chamberlain garage door opener is not working properly, you’ve misplaced a remote, or if it was taken, you should reset your opener.
To Resetting Chamberlain Garage Door Opener completely, you need to:
Delete your garage door memory (including all remote control and keyless entry codes) Link your remote control(s) again Configure your keypad If you face any difficulties with any of these steps, you should go to Chamberlain’s website and find your model’s user guide.
If nothing works, call Chamberlain customer support and they will help you out.
You can also see if you have a smart garage door opener and use your mobile phone as a remote.
Get Your Ethernet Back On Track with 9 Easy Helpful Tips
I hope you can Resetting Chamberlain Garage Door Opener. Thanks for reading!
How do I erase the remote control from the garage door opener’s memory?
Locate the LEARN button on the garage door opener. Press and hold the LEARN button on the door control until the LED turns off (approximately 6 seconds). All previous codes are now erased. Reprogram each remote control and keypad you wish to use.
How do I program a new remote control or keypad to the garage door opener?
Slide off the metal clip from your remote control. This will reveal a small button on the back center of your remote. Use the metal clip to press that button. You should see an LED light on the front of your remote control. Press and release the LEARN button on the garage door opener. The LEARN LED will light. Within 30 seconds, press and release the remote control button you want to use. Check to see if the garage door opener light bulb blinks. If not, wait for the remote control LED to light solid then slowly press and release the remote control button again. Repeat until the light bulb blinks.
How do I reset the keypad on the garage door opener?
Press and hold both the * and # buttons on the keypad until the lights on the keypad light up and then stop blinking. Enter a new 4-digit code on the keypad, then press the # button. Press the ENTER button the number of times that matches the color of your LEARN button. Finally, press 0 on the keypad to exit programming mode. Go to your Chamberlain garage door motor housing and press the LEARN button once. The LED on the motor housing will stay lit. You now have 30 seconds for the next step. Go back to the keypad and enter your 4-digit code again, then press and hold the ENTER button on the keypad until the light blinks in your motor housing.
1 thought on “Easy 3 Guides to Resetting Chamberlain Garage Door Opener ”